Wednesday, September 30, 2009

What's New Wednesday

Yay! I finally have some new designs to post today!! I started a rock n roll line and am in the process of starting an Asian inspired category. I am also posting some pictures of some Halloween glass blocks that I made. I haven't worked out all the little kinks with them yet but hope to be selling them soon. So check it all out and let me know what you think.


Tuesday, September 29, 2009

Halloween Apothecary Jars

Yay for Tutorial Tuesday! Today's tutorial I got from The Idea Room The first time I saw this post I knew I had to make some of these. I went to Deseret Industries a couple of weeks ago and found some awesome random jars. I've also been saving jars that I've emptied all in preparation for today! I started off by printing jar labels that were made by Johnny Love from here After deciding which ones I wanted to use I started distressing them. I did something different to every label but they all had at least one of these: crumpling, dunking in water, burning, and/or ripping. Once I had all the labels ready I started to fill the jars. I didn't have everything I needed (as you will see by my empty jars) but all the work is done and I think it turned great. It was really fun to do and I recommend it to EVERYONE. It's even something your kids can help you with! Check it out!


Monday, September 28, 2009

Next Day Flyers

Today for My Favs Monday I want to give a shout out to Next Day Flyers. A lot of people lately have been complimenting my business cards and asking where I got them. I had Next Day Flyers print them for me and I would recommend them to anyone. They are great to work with, super quick (hence Next Day Flyers) and their quality unbeatable. I had them help me with my husband's custom business cards and they too turned out great. They have a lot of different products to choose from and you can use their templates to create something or you can upload your own design if you have a premade one. If you are in need of business cards, flyers, postcards, menus...anything I promise you won't be disappointed with Next Day Flyers.


Sunday, September 27, 2009

What a week

I know that I have been MIA for a few days. Last week went super fast and I got sick and had to check out for part of the week. Sorry for the lack of posts, I promise to pick back up tomorrow. Hope everyone has a better week next week.


Stacy

Monday, September 21, 2009

My Favs Monday....the Spotted Box

As part of my marketing I have contributed to several different sample boxes and I have found that, although there are a lot of good ones, my favorite sample box is The Spotted Box. For those of you who don't know what a sample box is all about I'll give you a quick run through. For a buyer you can purchase a sample box which, for most sample box companies, go one sale once a month and are priced around 15-20.00 which includes the shipping. What you will receive in the sample box is different every month...it's almost like a grab bag. I love it because it's like opening a present every month. I never know what's in it but I know that I will like it! What you are sure to get is around 25 different samples from an array of artisans. Every sample box has a little bit different focus and you can look at their websites and see who the artisans are that will be contributing each month. Some companies focus on earth friendly artisans, some are focused on products that pamper you, some focus on kid friendly items and so on. Each sample in your box is a usable sample and most artisans also provide a coupon code in addition to their sample that you can use if you decide to order something from their site. As I stated earlier, there are many different companies that do sample boxes but my favorite is The Spotted Box. They are more geared towards moms and kids which is perfect for me....and I'm sure many of you. Every month I find that the box has a wide variety of samples from very talented people. I don't end up getting the same sample month after month from the same person. There are so many talented artist who contribute to this box that I always find the coolest things! This last month was their anniversary box and with my small samples I also got some Full Size items. It was a real treat and once again I was in awe of how talented some people are. I think my favorite part about their box is that there really is a wide variety of products. I get scrapbooking stuff, hair bows, jewelry, lotion samples, soaps and scrubs, candle tarts, chapstick samples (which are my FAVORITE), burp rags, yarn, vinyl decals, felt creations, lots and lots of different stuff. I have gotten boxes from other site and ended up getting a lot of the same stuff....like 6 different soap samples, 3 different lotions, 2 chapsticks,5 candle tarts - which is all great stuff but I like the variety of the spotted box better, that way not only do I get stuff to pamper my with but I also get stuff for my kids and get to find people who make cool stuff for children. Anyway, I'm going to wrap up my soap box but just saying that if you haven't tried a sample box before then give it a whirl. I think they are lots of fun!

Friday, September 18, 2009

It's that time again! Freebie Friday


This Friday I found this awesome PopATot activity center that is being given away at Lollipops and Polka dots After a summer of camping with a little one I think this just might be the best invention EVER!!! I love that 1) it's portable...duh 2) that there is a covering on the bottom so that their feet don't get fifthly 3) that you can attach the toys to it so that they can't keep throwing them in the dirt and 4) that you can get an attachable umbrella to go with it. Seriously the wonderful people who created this thought of everything! So if you would like to be entered in to win a popatot then go Here and fill out your entry information. You can also go to the PopATot website to find out more about their product!

Thursday, September 17, 2009

Thanksgiving

Today for Thankful Thursday I thought I would express my thanks for the up coming holiday season. Now I know that to most people this may seem a little early but for anyone who owns a business now is the time! Right now is when all the work is getting done so that once the holidays start rolling things can go smoothly. I think the holidays are so much fun and Fall is my absolute favorite time of year. I keep wanting to pull out all my fall decor but when we are still in the 90's everyday I find it hard to break it out just yet. I am thankful for the fun sights, smells, activities and amazing ideas that go hand in hand with the holidays. It is like the word 'holiday' itself just seems to get peoples creative juices flowing! I am thankful for the charity that seems to abound more freely during these short month. I am also thankful for the opportunity I have to see family and reconnect. I hope that it's not too early for you to be thankful for the adventures and memories that are soon to come!

Wednesday, September 16, 2009

What's new Wednesday??

Here are the new designs that I have made this week. There's not a lot but that's because I have been working on Halloween items that aren't quite ready to show yet. I hope you enjoy the few I post!


Tuesday, September 15, 2009

Tutorial Tuesday - Gummy Candy

So a while back I saw this tutorial on Not So Idle Hands on how to make gummy candies and thought I would give it a whirl. After making a special trip to the store to buy gelatin and once getting home realized that I had gotten pectin grrrrrr....I waited until my next outing to pick up some actual gelatin and then got started.


Note* I saw that she said her recipe make like a lb of gummy candy so I cut the recipe in 1/2

Get your items together

1 glass measuring cup
3 packs of GELATIN
1 small pack of jello
1/3 cup and a splash of water
candy molds
small/med. size pot


measure 1/3 cup of water into your measuring cup, pour in all the gelatin and jello and mix well. *note it works better to pour all the jello in first and then start mixing in the gelatin.


Cover and let sit for 10 min. While waiting start to boil water in a pot. About 1/3 of a pot of water.

Place jello mix and measuring cup into the pot in the boiling water. (this is going to act like a make shift double boiler) This will warm and melt your jello mix but NOT cook it.


Let it warm until the jello mix is in a liquid state. You don't want to cook the mix, just let it get runny enough so that you can pour it into the molds.


Take it out of the water and pour it into the molds. You don't need to spray the molds or prep them in any way, just pour the mix right onto the plastic. *note If you notice the jello mix getting thick you can place it back into the boiling water for a few minutes to soften it up again.

Wait about 10 min to let the candy solidify and........TA DA! You have gummy candy!! After I was done I thought that maybe I would try rolling my next batch in fine sugar....just so they aren't so sticky. Then they would be a little sugary like peach rings YUM!


It is fun to try this with different flavors, this was black cherry and I really thought they were kinda nasty LOL...but then we did peach and they were amazing. It's also fun to play with the water amount. The less water you use the less gummy the are (they are still gummy but more like a peach ring gummy than a rubbery gummy), the more water the more gummy...and I mean like I think you could chew it for a few minutes and not even begin the digestion process-gummy.LOL

Oh, and I forgot to mention about the molds. You can get them at any craft/candy store. I got mine at Wally World but I have seen them at Joanns and Michaels (not at craft warehouse)

Well I hope you enjoy this. They were fun to make and super quick. The kids LOVED them, and I mean LOVED them. The picture on the plate is everything I made with my "1/2 batch" and that night we took them over to friends when we went for dinner. The kids wanted the gummies over cookies and ice cream! They ended up gobbling the whole plate!

Monday, September 14, 2009

The Cutest Blog on the Block

Today for my favs Monday I wanted to give a shout out to The Cutest Blog on the Block. Not only do they have super cute backgrounds but they have awesome tutorials on how to do cool stuff to your blog like how to make your own background and how to add a signature to your blog. It's fun stuff that I would NEVER be able to figure out on my own and I think that the instructions are very straight forward and easy to follow. It is one of my favorite sites to hit up when I want to change things up. They also have free blog layouts, banners, templates and cool buttons, they also have backgrounds and templates for twitter! Really, this site is so cool. If you've never checked it out do it now!!! www.thecutestblogsontheblock.com


Not so Friday Freebie Friday

So I do realized that it's not Friday but I still wanted to do my freebie Friday. Checking through all of my great giveaway sites I found the La*Tee*Da*Kids giveaway on Fabulous Fun Finds. I love their fun clothes, their fabric combinations and their attention to detail. This is one of my favorite things they are selling but go here to check out their full line and be sure to go here to register for the giveaway. This giveaway ends 9/20 so hurry over!


Thursday, September 10, 2009

Thankful Thursday-Ella

Lately I have really been trying to focus on making my photography better. So today for Thankful Thursday I want to thank Ella Publishing Co. and Rebecca Cooper for making this amazing ebook "40 Tips For Better Photos

".

I downloaded it and read it last night and I loved it. Rebecca has a way of wording tricky photography lingo into understandable English. I felt the tips were great and will really help my photography. Some of the tips I already knew, but Rebecca just has a great way of sheading new light on it so that it just clicks and sticks a little better in my brain. So once again, Thanks Rebecca for a wonderful ebook.

Wednesday, September 9, 2009

What's new Wednesday?!

This is what I have been working on this week. I'd love to hear your thoughts. Is there anything you LOVE? Any thing you don't? Hope you enjoy!


Tuesday, September 8, 2009

Tutorial Tuesday

This is my first tutorial and I'm kind of excited! I just love fabric buttons. I have been eying some on etsy for quite some time now debating which ones I wanted to get. Then a friend of mine told me that I could make them myself so I though...SWEET! I'll give it a whirl. I tried it a week or so ago and it's true, you can make them yourself and it's SUPER easy!

Supplies: Scrap fabric. Pieces as small as a 2" square will work depending on what size button you are making
Fabric Button Kit: If you have already made them before you don't need the kit, you can just get the buttons themselves.
E600 Glue: Hot glue will work but "everyone" says this glue is the way to go!
Substrate: Whatever substrate you want to put the button on!

Alright so lets so a run down of what you need and where you can get it.

1) Scrap fabric. Easy enough....if you are a sewer or do lots of crafts. Not you? That's okay too. There are lots of places that sell "scrap" fabric for super cheap. I don't have a ton of fabric hanging around and the stuff I do have isn't that cute so I just bought a "scrap pack" of fabric for like 5.00 off of etsy. Here are some places you can get scrap fabric packs.

2) Fabric Button Kit. You can find these at any craft or fabric store. The ones I got were from Joanns and looked like this. Some of them come in a kit with a plastic white and blue "thing" and some just come as buttons. If you don't have the white and blue "thing" you need it, so buy at least one pack that has it then after that you can buy them without. *note: make sure the other buttons you buy are the same size. You will need a white and blue "thing" for every size button you want to make.


3) Glue. The E600 is said to be the best. One of the many great things about it is that the glue won't stick to your hands, so if you get it on you because you are working with small objects you won't have to live with it for the next week - or rip your skin off. You can get it at any craft store and it usually looks something like this.


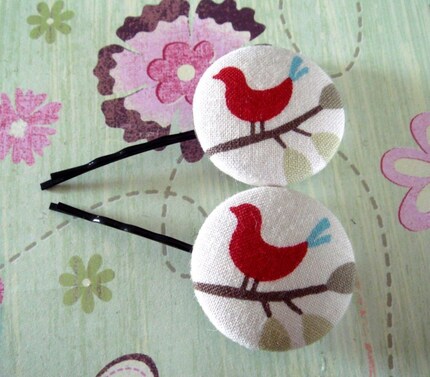
4) Substrate. Pretty self explanitory. Once you make these super cute buttons you will want to use them. The things you can do with them are ENDLESS. Below are several pictures of what you can, but are not limited to doing with them. Hair ties, bobby pins, bookmarks, bracelets, hair clips and buttons just to name a few.


Once you have everything you need all you have to do is follow the simple instruction of the back of the button box.

1) cut out fabric to so it is the same size as the pattern they give you on the back of the box
2) place fabric wrong side up (or right side down) on top of the WHITE plastic "thing"
3) place the top part of the button, the smooth, rounded one, on top of the fabric with the smooth rounded part facing down.
4) press the button and fabric down into the white "thing"
5) push all the fabric that is sticking out down
6) cover it with the second part of the button.*note if you are going to glue the button onto something like a hair clip, then take some pliers and remove the round metal loop that is used to sew the button on with
7) place the BLUE "thing" on top of the button and push down HARD until you feel it snap.

TADA! You just made a button. Isn't it so cute?

Now go attach it to something super cute!

Saturday, September 5, 2009

Chickadee Vinyl SALE

Yup, you read it right, my Etsy store is having a sale! I am cleaning out my glossy vinyl to make room for more matte colored vinyl. Nothing is wrong with the glossy, it is actually more versitile I just found a local dealer who has a lot more options available in the matte so I decided to switch to all matte vinyl. I would love to be able to use up my glossy vinyl so that I literally have room for more matte vinyl. So here is the sale: Buy one get one for 50% off! This is for the glossy colored vinyl only! All my graphics can be cut with glossy vinyl. Check out the colors posted with each item to see what colors are available! Here is a link for easy access, have fun!

SHOP HERE!

Friday, September 4, 2009

Freebie Friday Flirty Aaprons

One of my new favorite things are fun aprons! As of yet I don't have one but I have been wanting one for a long time. I love to cook and totally destroyed my old apron when I wore it while crafting and got epoxy all over it. What can I say, I have mad skills LOL. I guess the biggest reason I haven't gotten one yet is because I was debating between buying one or making one. With this fabulous giveaway I found this morning, offering fun flirty aprons, I don't have to do either! Sarah over at Sarah browns favorite things is hosting a giveaway for Flirty Aprons! Check out some of the cute aprons they offer!


They also offer aprons for little girls so you can have matching or coordinating aprons. How cute is that?! It makes me wish my little one was old enough to use one.

All you need to do is jump over to Sarah's Blog and leave a comment! There are also other ways to add extra entries, check'em all out!